
Pottery Studio Setup at Home – The Bare Bones Basics!
Let’s be clear, this is not a guide to the “ideal pottery studio”. This is, however, a guide to the very basics. The down and dirty, bare bones basics that will get your hands covered in mud and making.
Carve Out a Space
First, you need space. You really can’t skip this part. However, you need less space than you might think.

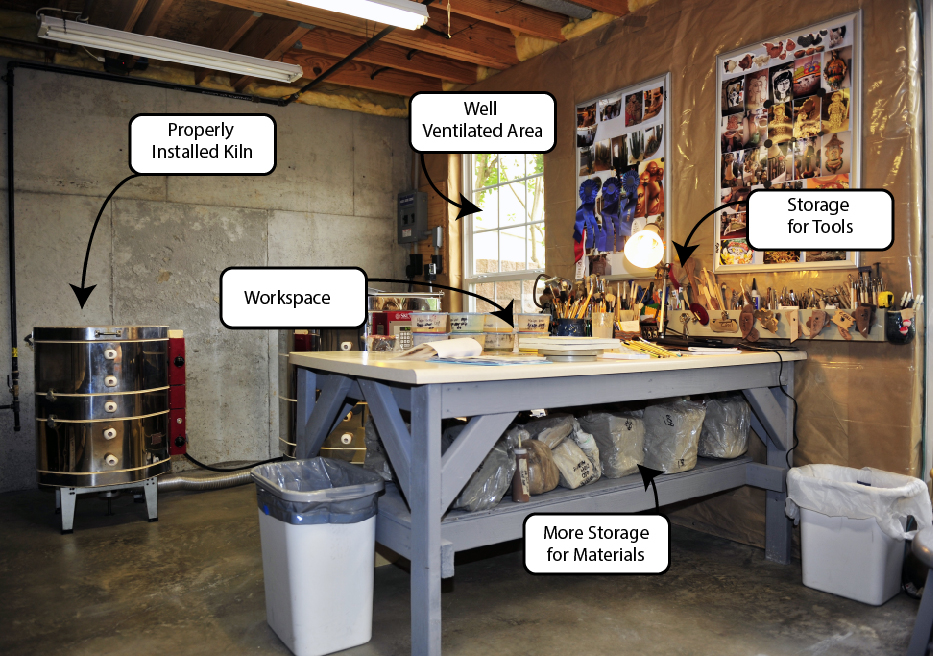
The minimum space needed would include:
- Just enough room to move around safely
- A work-space for hand building and/or room for a wheel
- A small shelving unit for tools and drying wares
- A place for a kiln
Typically, a kiln needs a 12-18″ clearance between it and any nearby flammable objects, like walls, which is important to keep in mind when choosing a space. And, you need to make sure the area is well ventilated so that any toxic fumes can make their way outside.
Keeping dust to minimum will save your lungs, and this means wet mopping often. The ease in which you can clean and maintain the space should be a factor to consider.
Get a Kiln
You can make all the pots you want, but at some point, you will need a kiln to fire your work. But, it doesn’t have to be fancy.

Check your local classified ads – Craigslist and Facebook Marketplace are great places to start. Check out my guide to Buying a Used Kiln!
PRO TIP: Watch out for ceramic molds. Many times, used kilns will come with a caveat that you must take EVERYTHING. Beware! Unless you have a passion for slip-casting, steer clear! They take up space, are excellent spider nests, and are heavy AF.
Okay, so you have your old janky kiln…now what?
Well, you need to be able to power that baby. On the side of every kiln there is a metal plate that states the requirements it needs. This is important. You need to have the proper amperage and outlet in order to have it function properly. This is a place you can’t skimp . Hire an electrician to make sure your kiln is installed properly.
Shelving & Storage Space
Next, you need a place to put things. Like everything else on a budget, this doesn’t have to be pretty. You can go to your local discount box store and get a plastic shelving unit for $15 bucks. It will work, for now. You need enough space to put anything you are drying, plus, enough room to store things like:
- A Few Kiln Shelves and Kiln Posts
- Bags of Clay (A large storage tote works great!)
- A Water bucket (Reuse a laundry soap container by cutting off the top!)
- Basic Clay Tool Kit (Most include: a sponge, a needle tool, wood potter’s rib, a loop tool, a ribbon tool, a wood modeling tool, a wire clay cutter and a steel scraper.)
- Bottles of Commercially Made Glaze
- Wax (for waxing your bottoms)
- Brushes (for applying glaze and wax)
- A Towel
A Wheel (optional)
To be honest, if you are just starting out, this is not essential for a pottery studio! (Or, if throwing just isn’t your thing!)
Again, head over to the classifieds – if there isn’t anything now, keep looking, they come up often and for dirt cheap!
THAT IS IT.
Certainly, there are better ways to do this. Again, this is not the ideal setup. This is the bare bones, making due with what you have, solution to a pottery studio at home. From here, you can slowly upgrade and expand your little makeshift pottery studio into a sanctuary.
Hi, I noticed that you didn’t mention any clay trap for the sink or 3 bucket system. What do you suggest for a setup like this?
You are right. In fact, I did not mention a sink at all! Ha!
I don’t have one in my studio to be honest. I have to haul my water 100 feet to my studio.
However, I found this awesome project online. I have definitely been considering trying to make something like this! There are a ton of other plans out there for sink traps as well.
While it would be amazing to have running water, it isn’t a necessity for me yet, and as long as you aren’t washing off glaze that has a toxic material in it, you should be fine chucking the water out in the yard when done.
For any items, like a sponge used to wipe of a foot after glazing, I keep a 5 gallon bucket handy just for this and only this. Once it has enough sediment built up, I let the water evaporate. Then, I place the dried up material in a bisqued bowl and fire it. Once it is fired, it is generally considered safe to then chuck in the garbage. Of course, check your local laws to make sure this is true in your area.
Once I am able to get water out there, I will for sure post my solution!
Hi, how do I set up a small studio for hand building, just me, safely in my finished basement. Have a small 12’ by 8’ room with a door. Just bought a Environklenz particulate machine. Suggestions would be great.
Thank you.
If you are working in a basement you will want to keep ventilation in mind. You will need to exhaust your kiln in some way. It is best to go to your kiln manufacturer and follow their guidelines for ventilation, as well as, placement in your studio. Thanks for reaching out, and best of luck setting up your studio!
I have a kiln but no wheel (yet). I will be hand building and wondered what kind of table I should use for it. I have a less than ideal fold up card table. It’s prob ok for making small things but I don’t think it will do for wedging and rolling out clay. Any recommendations would be great!
Something sturdier would be ideal if you are wedging on it! My current wedging table was one an old executive desk that was re-purposed at some point. The drawers and hardware were removed, but it is still a beast that makes contact with the floor on three sides (no legs if that makes sense). I knicked it when it was set out by the dumpster at my local university. (They upgraded to some custom made tables.) The canvas was pretty worn, so I bought new canvas and a staple gun to re-canvas the top!
Hi Sumi! Your blog posts are really useful for aspiring potters. Could you give any advice on what to look for when buying a 2nd hand pottery wheel? Thanks, Kate
Thank you for the comment and kind words Kate! I will add that to my list for a new post! When I was buying a wheel used, I made sure that it worked, and that the pedal depressed smoothly. What I didn’t check was if the wheel head was warped. The one I got had a hard plastic wheel head (not seen very often) that had a small split in the plastic that threw me off center at first. I learned to work around it, but it wasn’t ideal. I would definitely check that it stays level while it is rotating. Another thing to check is the responsiveness of the pedal to wheel speed. If there is an issue, usually you can just clean it out, but that takes time and patience. Make sure the splash plan is included and still fits correctly as well! Luckily, they are relatively simple machines!